Chips and Dips
Published May 25 2020
Bake Club Chips & Dip
Ranch Dip
Makes about 1 cup
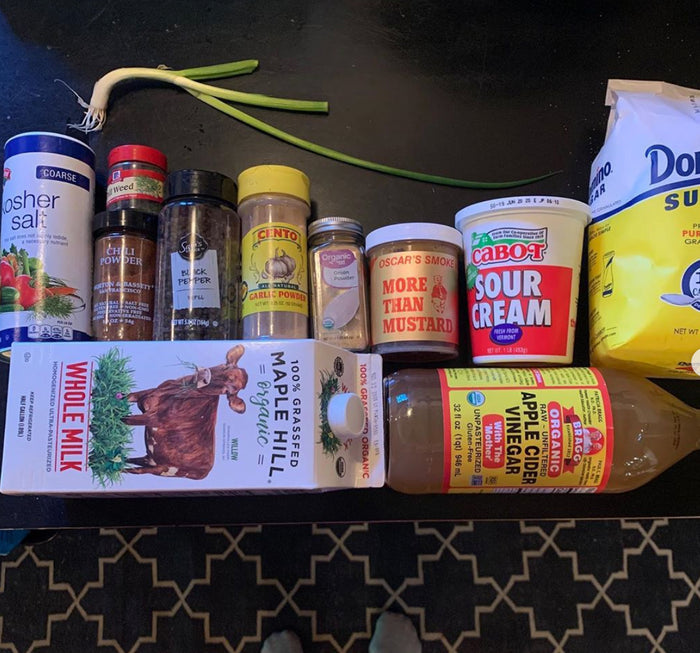
2 tablespoons dried chives
1 ½ tablespoons onion powder
1 teaspoon kosher salt
2 teaspoons garlic powder
2 teaspoons sugar
½ teaspoon black pepper
½ teaspoon dried dill
Pinch chili powder
1 cup sour cream
1/4 cup buttermilk
1-2 teaspoons mustard
1 lime zested, if you really want to change your life with this ranch!
Mix together the chives, onion powder, salt, garlic powder, sugar, pepper, dill and chili powder in a small bowl. Add in sour cream and buttermilk mustard, and citrus zest, if you like, whisking until all is combined. Let sit in the fridge for at least 3 hours to develop flavor.
The dip will keep in an airtight container in the fridge for up to a week.
Got excess herbs in your garden or crisper drawer? Don’t let ’em go to waste! You can dry and use them in this recipe or any recipe that calls for dried herbs. Set the oven to its lowest temp. Clean and dry the herbs, leaving the stems on. (Disembodied leaves blow away too easily.) Arrange the herbs on a lined baking sheet—use a Silpat or a kitchen towel—as direct contact with a metal baking sheet will darken the color of the herbs. Turn the oven off, put the herbs in, and leave them in the oven for at least 4 hours, or overnight, until they’re dry and brittle. Separate out and discard the stems and store the leaves in airtight containers at room temp for up to 6 months.
Burnt Honey Mustard Dip
Makes about 1 cup
½ cup honey
½ cup sour cream or plain yogurt
½ cup yellow mustard
½ teaspoon kosher salt
1 tablespoon honey
Pour the ½ cup honey into a medium saucepan, and cook over medium heat until the honey caramelizes, 10 minutes. The honey should be bubbly and deep brown, like no place you’ve ever taken a pot of honey before. Be careful!
Remove from the heat and whisk in the yogurt, mustard, salt, and the remaining 1 tablespoon honey (this is unburnt for a kick of sweetness). Chill in the fridge before serving. The dip will keep in an airtight container in the fridge for up to a week.
Tortilla Chips
2 cups vegetable oil
6 tortillas (flour or corn)
1 teaspoon salt
Salt for seasoning chips
Heat 1 cup oil in a heavy bottomed pan.
Cut each tortilla into 6 triangle shaped wedges.
Heat the oil on medium high heat until a small piece of tortilla placed in the oil sizzles, about 350°F. (This is where an infrared thermometer comes in handy!) If a small tester piece of tortilla browns too quickly, the oil is too hot. Remove the pan from heat to let the oil cool a bit before continuing.
Place a paper towel onto a large plate and have several other paper towels ready. Place a handful of tortilla triangles into the hot oil, in a single layer.
Use metal tongs or a metal slotted spoon to distribute the tortilla triangles so that they aren't overlapping and so that all sides get coated with oil.
Fry for approximately 2 minutes until the chips just begin to color and they are firm, no longer pliable.
Move chips to a paper-towel-lined plate: Use tongs or a slotted spoon remove the chips from the oil to the paper-towel-lined plate.
Sprinkle with salt.
Place another paper towel over the top of the chips to be ready for the next batch.
Note that as soon as you put the tortilla triangles into the hot oil, because you are working with such a small volume of oil, the oil temperature will lower. Usually I compensate for this by increasing the heat to high. And as soon as the chips begin to color, I reduce the heat to low, so the oil doesn't overheat in between batches of chips.
Continue to cook the chips, working in batches, placing the freshly fried chips over a new layer of paper towel each time, and sprinkling with salt.
When the chips are all fried, pat any excess oil from them with a fresh paper towel, and eat! These chips are best freshly made.